
Have you been thinking about tiling an entire bathroom wall all by yourself? It’s not uncommon for homeowners to go ahead with DIY projects of this kind. With so much information on the Internet these days, one can easily get lost. To save you some digging, here is a step-by-step guide on how to tile a bathroom wall, from prep work to grouting. Read on.
Where Do You Start When Tiling a Bathroom Wall?
You want to start at the widest part of the wall and work your way to the narrowest area. But you will have to put more effort into this than you think. You may not be a bathroom tiling professional but you can still do a decent job if you know what you are doing.
Here are some instructions to give you a clear idea of how to tile a bathroom wall with large tiles or small tiles. Once you learn the ropes, you will be able to apply the technique for any tile size and any area in your house, be it a splashback or a shower cubicle.
How to make the right calculations if you are not a bathroom fitter
Before you start your DIY bathroom tiling project, there are a few things to do. The first step is to calculate how many wall tiles you need. Unless you hire a professional tiler in Surrey to get the job done, this one is on you.
Once you settle on a tile design and material, you’ll know the size of your future tiles. Measure the entire wall area you want to cover and divide that by the area of each tile. The number you get is the number of tiles you want.
Just to be on the safe side, add a 10% on top for extra tiles, which will cover breakages and edges. As you know, unexpected things can happen during renovation so you want to be one step ahead. Of course, this will increase the average cost of your project and the time it takes to be complete.
Now, your calculations should consider one more factor which will take up some of the space on the wall - grouting. Grout gaps are around 2-3 mm each with respect to a typical bathroom wall.
Keep in mind that different wall surfaces will be able to handle a different maximum weight of tiling per square metre. For example, plywood can tolerate up to 30 kg/m2, while plaster only allows up to 20 kg/m2. If a sealant is required, make sure to apply it before you proceed to the grouting stage.
How to measure the wall
The next step is to measure the wall. Make a tile gauge that will tell you exactly where your wall tiling project should begin. You need a piece of wood to use as your wooden batten or gauge stick. It should be long enough to cover the wall halfway. Start horizontally by marking the width of each tile along the length of the wooden batten.
Next up, you want to measure the horizontal midpoint of the wall. Now, place the gauge rod alongside the wall, making sure one of the marked lines meets the midpoint. Begin to move your gauge stick to the left, from one mark to the next until you get as close to the corner trim as you can. When you do, check out the gap that forms between the end of the gauge stick and the wall. If it measures a distance the size of half a tile or greater, this is okay and should be your starting position.
However, if the length of the space is less than half a tile wide, this will throw everything off balance. If this is the case with your bathroom, go back to your horizontal midpoint and try to move it slightly to the right by half a tile length.
Then, go back to the external corners with your gauge rod and measure that distance again. It should now be the perfect length that will allow you to get going. Make your marks accordingly. You want to have a straight edge. This will be the place where you will install the bottom row of tiles. Don’t forget to allow enough space for the grout joints. If necessary, measure the distance between the corner and the tile edges.
Don’t forget that in addition to the horizontal line, you should also have a vertical one to use as your guide when you are laying the tiles. This will create a clean edge and help you handle uneven walls.
To do so, get a spirit level to mark a perpendicular line relative to the flooring. Repeat the procedure you did for the horizontal part. Find the vertical midpoint of the wall. When you do all the marks, secure two gauge sticks or wooden battens onto the wall - one will be attached vertically and the other horizontally.
Placing the tiles
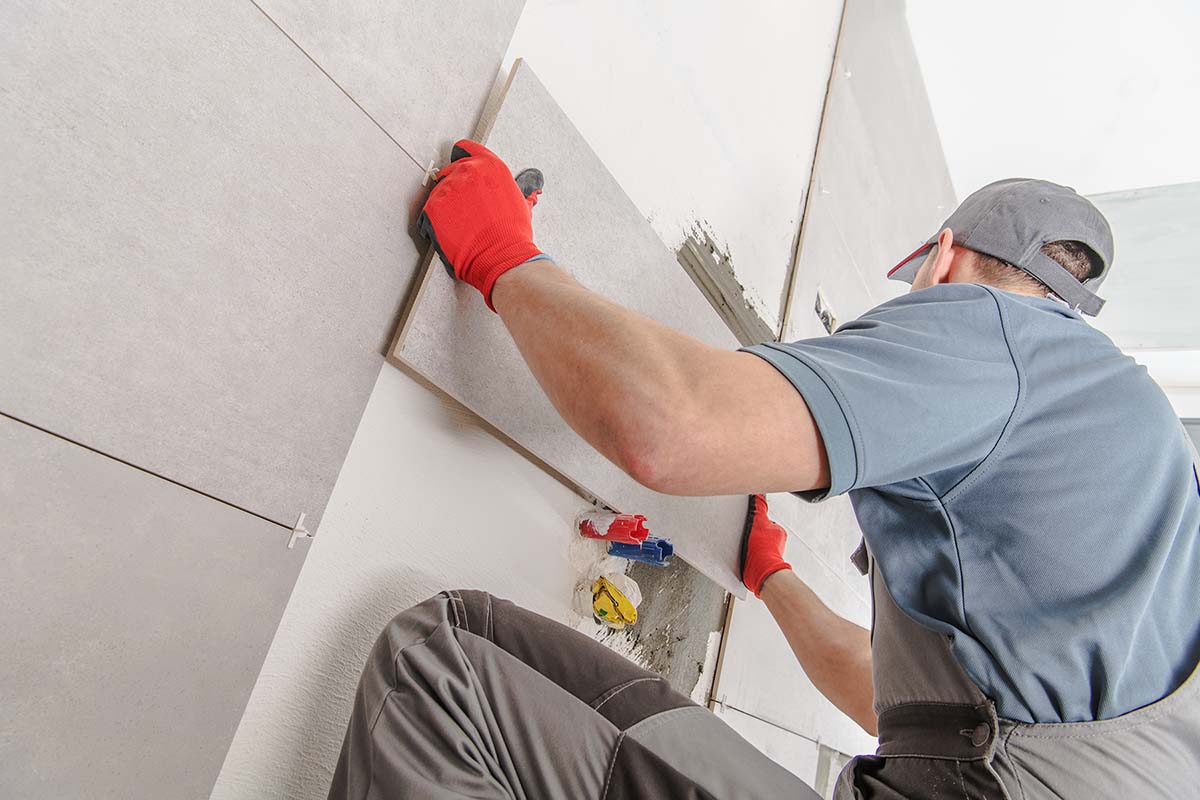
If you want to save yourself the tile fitting costs, you will be willing to do this step on your own. Don’t start at the corners because this may create a messy finish instead of an elegant finish. Work one tile away from the corner trim. Ideally, this is where you are going to place the gauge stick/gauge rod.
When you cover the entire wall, you will go back to the corners. Prep the correct types of adhesive by following the manufacturer’s instructions printed on the label. When the mixture of water and powder adhesive turns into a thick putty-like paste with no lumps, you are ready to go.
Don’t put too much product on the trial if you have not mastered the technique yet like a pro tiler would. If your working speed is too slow, the adhesive may have dried out by the time you get to all the parts where it has been applied. Place tile spacers in the grout lines to ensure there is enough room between the bathroom tiles.
When you start placing tile after tile at floor level, don’t forget to check if they are aligned with your marks and gauge rods. Using a spirit level, see if the tiles are level and flat. A damp sponge will help you remove excess adhesive as you go.
For the pieces that will sit in the corners, you may need a tile cutter especially if you are dealing with larger tiles. Be careful with that. You might want to use dust mask and safety goggles or safety glasses to do the trick. For small adjustments, go with a tile file. At the end of the procedure, you have to remove the wooden battens.
Let the tiles rest for a while so that the adhesive has time to dry. Clean the tile surfaces with soapy water and use a window scraper as necessary but be careful not to scratch the tiles.
Grouting your tiles and grout selection
Your last step of the project involves grouting. Even though it carries additional costs to the project, there is no doubt about the importance of grouting. It acts as a sealant layer, preventing moisture from getting trapped under the tiles and compromising the results. There are two types of grout available on the market, powdered and ready-mixed. Whether you opt for one or the other depends entirely on your preferences. The choice is all yours.
If you are a beginner, it’s best to work with a pre-mixed adhesive. Choose the grout colour wisely. White grout is more difficult to clean than grey. The type of grout is also vital for your project. There are four main categories.
Number one is unsanded grout is used for small grout lines. Finely-sanded grout is used for tile joints between tiles that are 1/8” to 3/8” wide (0.3175 cm - 0.9525 cm). Next, we have quarry-type grout. It is the same as the previous one but it requires that you use a coarser grade of sand.
And lastly, there is epoxy grout. It is perfect for wet areas because it can create a waterproof surface but it's also more difficult to apply. Consisting of a hardener and epoxy, epoxy grout is stain-resistant as well.
Keep in mind that the grout can dry off too quickly, so use as much as you can apply in under 30 minutes. Grab a grout spreader and place the grout paste in the gaps between the tiles. Make sure to fill all grout lines. Work with diagonal and upward strokes to get the job done. You have to be quick.
This procedure will stain the tiles; hence you need to clean them when you are finished. Use a damp sponge to remove any grout residue from the surface. Then, employ a grout finishing tool (flat blade) to give a complete appearance of the tiles. To add a durable finish, spray the grout joint with a grout protector, which will extend the life of the product.
It may be a little daunting, but doing the grouting part yourself will decrease the cost of tiling and is worth considering. This way you can choose a more expensive tile layout.
How Much Does it Cost to Get a Bathroom Tiled?

In the UK (including Surrey), bathroom tiling prices can fall anywhere from £200 to £700 depending on the extent and complexity of the project. This typically covers the cost of the labour of the bathroom tiling professional, as well as the different type of materials including adhesive, grout, tile materials, size of tiles, and tile types.
Note that standard tiles may be less expensive than specific tiles. That said, wall tiles run cheaper than floor tiles. It goes without saying that tile removal and tile repair aren’t typically included in the aforementioned price.
Floor tiling cost per m2 in Surrey, UK
Cost of tiling services (tile installation and replacement): £20 - £40 per square metre or £150 - £200 a day (top-rated bathroom tilers charge differently - there are both day rates and hourly rates)
Average floor tiling cost: £40 - £1600 (again, it could be cost per m2 or daily rate)
Other common tiling jobs include sealing around the edge of the tiling; sealant and grouting services run £17 - £25 per hour.
In comparison, kitchen tiling costs fall slightly higher in the price range.
Natural stone tiles or manmade tiles come in a wide range of styles and prices:
- Slate tiles - £40-£50 per m2
- Terracotta tiles - £5-£6 per m2
- Glass tiles - £100-£160 per m2
- Mosaic tiles/mosaic tiling - £79 per m2
- Border tiles - £18 per m2
- Porcelain tiles - £50- £100 per m2
- Marble tiles - £40-£70 per m2
- Limestone tiles - £50-£80 per m2
- Granite tiles - £80- £90 per m2
The average tiling cost will be influenced by the speed at which the job is done. If you hire tiling specialists who can do your bathroom tiling project for a day instead of 5 days, it will prove much more affordable.
What else should be factored in other than the type of tile? If you want to do the job yourself, a 3-kg bag of flexible white grout runs for £14.99 on Amazon. The cost of tiles varies per material, tile design, and the tile pattern you are going for. Like everything, there are both affordable and pricey products and services. The choice for bathroom tiles and bathroom tiling cost is left in your hands.
Questions & Answers
Where do you start when tiling a bathroom?
You should always work from floor to ceiling, moving away from the corner trim. To get a neat finish on the corners, use tile trims.
How do you tile over existing bathroom tile?
A: Start by inspecting the area. Your existing tiles should be in tip-top condition so you have a stable base for your new tiles. If there is a loose tile or you come across chipped and broken pieces, replace them with good ones. Clean the surface like you normally would to eliminate any debris and gunk. Next up, apply primer slurry the purpose of which is to create a good bond with the existing material. Obtain a tile-to-tile adhesive and start installing your new pieces. Finish off by grouting.
How do you stick tile to tile?
Simply add your adhesive to the old tiles and spread it evenly on the surface. You want to comb in one direction. When you are done, install the new tiles over the adhesive. Remember that tile choice is of great importance.
Can I put new ceramic tile over old tile?
Can you do it? Yes. Should you do it? That is a different question. If you want to achieve optimal results, you ought to ensure that the surface underneath the old tiles is solid. Also, there had better be no chips in the existing tiles because this could create more problems in the future.
What is the best adhesive for tiling over tiles?
When it comes down to bathrooms, your safe bet is thin-set mortar, which is perfect for areas prone to moisture. If you are going to tile your kitchen, which is a drier room, then you can go with mastic adhesive.
Can you install tile on drywall?
Most likely, it is okay to tile over drywall. But you need to make certain that the area in which you want to do this has to be safe from excessive moisture. Otherwise, your effort will be in vain.
Is it cheaper to regrout or retile?
There is no doubt that your bathroom cost will be more bearable if you regrout. However, you should remember that regrouting doesn’t last as much as retiling and it may prove to be more expensive in the long term. So, if you see this as an investment, you’d better stick with new tiles. There is a wide range of styles to go with.
When tiling a wall do you start at the top or bottom?
You always want to start at the bottom since the tiles are heavy and they can slide down a little if you begin with the upper rows.
Which colour is best for bathroom design?
White has always been the most preferred colour when it comes to average bathroom interiors and there is solid reasoning behind this. White can make any space appear visually bigger because it’s light and bright. It also makes everything look orderly and clean. By contrast, dark tiles will make the room look smaller; plus, they show limescale and white film more easily. You will have to wipe them dry every time you shower. This is tedious and time-consuming.
How much is it to replace a pool tile?
It’s around £25 per m2 and the price varies from area to area.
How much does it cost to retile a bathroom shower enclosure?
It depends on the size of the area. The price will start at £150 for shower panels.
How do you choose from the top-rated bathroom tilers?
Finding a bathroom tiling expert is anything but easy because there are no special qualifications for tilers. A good place to start is to look for a CITB or an NVQ qualification. Also, they will probably be extremely busy. If they can "squeeze" you in between clients tomorrow, this is a sign they may not be reliable.
If you're looking for more tips on bathroom renovations, you can find them in our bathroom renovation ideas article as well as some bathroom decoration tips and advice.